
BRCGS Global Standard Food Safety Issue 9 – Clause 5.2.4: Cooking (heating) instruction validation
30 July 2025 | Greg Hooper, Microwave and Thermal Process Specialist
The BRCGS Global Standard Food Safety Issue 9 – Clause 5.2.4 states that “Where cooking instructions are provided to ensure product safety, they shall be fully validated to ensure that, when the product is cooked according to the instructions, a safe, ready-to-eat product is consistently produced”. This white paper helps to explain what should be considered to ensure cooking instructions are fully validated as required by the Standard.
What is cooking (heating) instruction validation?
Instruction validation is the use of a methodology, procedure or protocol to help ensure that the cooking or heating instructions for a food product are developed and tested to achieve a ‘safely’ heated product for consumers to eat of acceptable quality. The key aim is to ensure the target product will be sufficiently heated to destroy and remove any appreciable risk of food poisoning from key heat resistant pathogenic bacteria which may, or may not be present in the food, especially those able to grow at (chilled) storage temperatures. The target organism for destruction is usually Listeria monocytogenes, but other micro-organisms may also be targeted e.g. viruses in shellfish.
Successful instruction validation is usually defined as a test challenging the cooking or heating instruction. This ‘test’ should be performed using calibrated devices, appliances and worst-case samples with sufficient replicates to allow an acceptable degree of confidence in the results.
An instruction is considered acceptable if it delivers sufficient temperature and time at that temperature to destroy the target organism (Listeria monocytogenes). A 6-log reduction is usually considered an acceptable safety margin i.e. if there were a million units of the viable bacteria, the thermal (heat) process would need to be sufficient to reduce the level to just one unit. This can either be measured by inoculating the food with the target bacterial organism (or one with similar death kinetics) and measuring the reduction in the viable target bacteria after heating the product. An alternative method is to measure the temperature (and time at that temperature) and then calculate how many of the target bacteria would have been killed if they had been present. This method is easier to perform and most likely to be used. For the purposes of instruction validation discussed within this document, only the temperature and time method will be considered as it can be performed using standard equipment that should be available in most food production premises.
The target minimum time and temperature (thermal process) for most products (chilled and frozen) not considered ready to eat is 70°C for two minutes or an equivalent process of time and temperature. It is imperative that this is measured in the slowest heating location (cold spot) of worst case product samples (slowest heating).
Thermal process and minimum temperature requirements of heated foods
The target temperature aimed for at the end of the cooking or heating process depends on whether the food can be classed as safe to eat (ready to eat) without further thermal treatment (such as some bakery goods, or canned foods) or whether the food requires reheating to kill any possible food poisoning bacteria that may have re-contaminated or grown on the food prior to the cooking or heating. With the ready to eat products, heating is purely to make the product palatable and taste sufficiently hot. Therefore, the temperature to which the ready to eat product is re-heated depends on several factors, such as personal taste (some people like their food hotter than others!) and the ability of the food to hold and conduct heat (for example soup is best served hotter than Christmas pudding). It is important to understand that products defined ready to eat must be so and evidence needs to be available to back-up this claim if the ready to eat status is challenged.
This guide focuses on foods where the heating process is a necessary step to safeguard the consumer from possible food poisoning. It is difficult to produce a food where once it has been cooked, cooled and stored there is no bacterial recontamination and/or growth. For example, almost all retailers require that raw food and food that has been pre-cooked prior to selling to customers (e.g. lasagne) achieve sufficient time and temperature during re-heating to kill any pathogenic (food poisoning) bacteria that may have contaminated or grown on the food during the production and chilled storage (by the retailer or consumer) processes.
Why is heating foods important?
Food is heated primarily to kill pathogenic bacteria so it’s safe to eat and more palatable. One of the most temperature tolerant pathogenic organisms able to grow at low temperatures (even at fridge temperatures of 5°C) is Listeria monocytogenes. The destruction of this bacteria requires a sufficient thermal process - meaning a combination of time at a temperature - to kill it. The higher the temperature the bacteria are subjected to, the greater the killing effect. Similarly, the longer the time at a temperature the greater the killing effect.
For food safety, the generally accepted thermal process is that the slowest heating location within the food (cold spot) must receive an equivalent heat treatment to two minutes at a temperature of 70°C. This has been proven to reduce Listeria monocytogenes numbers one million-fold. This process has also been shown to be able to eliminate or reduce levels of other food poisoning bacteria such as E.coli and Salmonellaadequately.
Equivalent process
‘Equivalent process’ is an important term to understand when determining what temperature (and time at that temperature) is required when re-heating foods. As already explained, the usual thermal process required when re-heating foods is to attain and hold a temperature of 70°C for two minutes. However, an equivalent process to this can be achieved by higher temperature and shorter times or by lower temperatures and longer times. There is a method to calculate this and the table below outlines the different time and temperature combinations calculated to achieve the same (equivalent) thermal process to two minutes at a temperature of 70°C (using a z value of 7.5).
Table 1 shows that if a temperature of 80°C is achieved in the product and this is held for five seconds, this would be equivalent to holding at 70°C for two minutes. The table demonstrates that just because a product is hot, does not necessarily mean it would be safe to consume. For example, a food at 60°C would still be considered hot to eat, but the food would need to be held for over 43 minutes to achieve the same level of bacterial destruction as achieved at 70°C for two minutes!
It’s important to measure both the temperature achieved by the food during re-heating and the time at that temperature, to ensure that the food is safe to consume.
How is the equivalent process measured?
When developing instructions, to give consumer guidance on the safe reheating of foods, techniques need to be employed that can record both the temperature of a product and the time at that temperature. Suitable temperature measurement probes can be inserted into the food and an electronic data logger used to monitor and measure the temperature of the food at the probe tips at given time intervals. This makes it possible to produce a graph that plots the food temperature against time during the re-heating process.
| Temperature at the slowest heating point (°C) | Lethal rate (min) (equivalent to 1 min at 70°C) | Time required at the reference temperature to achieve an equivalent process (min) |
|---|---|---|
| 60 | 0.046 | 43.48 |
| 61 | 0.063 | 31.74 |
| 62 | 0.086 | 23.26 |
| 63 | 0.116 | 17.24 |
| 64 | 0.158 | 12.66 |
| 65 | 0.215 | 9.30 |
| 66 | 0.293 | 6.83 |
| 67 | 0.398 | 5.02 |
| 68 | 0.541 | 3.70 |
| 69 | 0.735 | 2.72 |
| 70 | 1.00 | 2.00 |
| 71 | 1.36 | 1.47 |
| 72 | 1.85 | 1.08 |
| 73 | 2.51 | 0.80 (48 s) |
| 74 | 3.41 | 0.60 (36 s) |
| 75 | 4.64 | 0.43 (26 s) |
| 76 | 6.31 | 0.32 (19 s) |
| 77 | 8.58 | 0.23 (14 s) |
| 78 | 11.66 | 0.17 (10 s) |
| 79 | 15.85 | 0.13 (8 s) |
| 80 | 21.54 | 0.09 (5 s) |
Table 1 Equivalent processes to achieve 70°C for 2 minutes
This data can be analysed and the equivalent thermal process calculated (to ensure that the instructions allow the product to achieve an equivalent process to two minutes at a temperature of 70°C). Figure 1 shows the time/temperature trace of a heated food and the equivalent thermal process achieved during the re-heating process. The vertical scale on the left shows the temperature at the cold spot and the vertical scale on the right shows the equivalent thermal process (to minutes at the reference temperature of 70°C):
The product was heated for five minutes and given a two-minute stand time. Points of interest include:
- After 4.5 minutes heating the minimum temperature was above 70°C, but the product had not achieved the required thermal process equivalent to two minutes at 70°C
- After approximately five minutes heating a thermal process equivalent to two minutes at 70°C was achieved (with a product temperature of 76°C)
- The product cold spot temperature continued to increase after removal from the heat source after five minutes (due to conducted heat energy from hotter areas of the product)
- Removing from the heat source and allowing a two-minute stand time allowed a large increase in the thermal process - equivalent to 70 minutes at 70°C
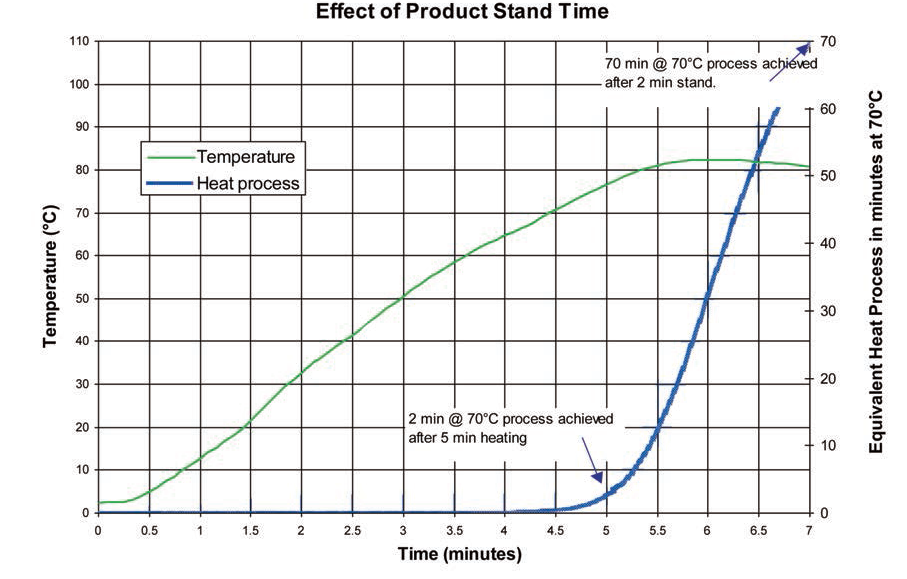
Figure 1. Change of equivalent thermal process with cooking time
It is imperative that the slowest heating location (or cold spot) is identified and the temperature at this location is monitored using a probe. If the cold spot is missed and this slowest heating location does not receive the required minimum thermal process, then there is a possibility that any food poisoning bacteria present will not be sufficiently killed and so pose a risk to consumers. Using a ‘hedgehog’ device (multiple probes set into a grid array to measure several product location temperatures at the same time) or a given number of temperature measurements may not locate the cold spot. Careful and thorough probing of the sample is necessary. The cold spot may not be where expected e.g. during microwave heating it is possible the cold spot may be near the product surface depending on the microwave field patterns.
Some products e.g. whole muscle steaks may be considered safe and may not need to attain any particular thermal process internally, but all surfaces (including sides) would still need to achieve this minimum thermal process to remove any surface contamination. It is relatively straightforward to sufficiently heat the top and bottom of a ‘rare’ cooked steak, e.g. simply by flipping in a frying pan, but consideration must also be given as to how the sides of the steak are sufficiently heated.
Procedures to aid achieving appropriate instruction validation
Calibration of temperature measuring devices
Any devices used to measure temperature of a thermal process needs to be calibrated on a regular basis against a UKAS certified reference thermometer. It is important that the device is accurate, and the calibration offsets should be known and used. Calibration of devices should be performed depending on the initial temperature of the samples requiring testing e.g. at frozen (-18°C), chilled (5°C) and at approximately 70°C temperatures.
The size of the device probe is also important. If it is too large (diameter) it may not record accurate temperatures due to the thermal mass of probe. Generally, the thinner the probe the faster the response time and the less the effect the probe temperature may have on the temperature of the food. Campden BRI calibrate their instruction validation probes on a regular basis to an accuracy of +/- 0.1°C and take into account the offset if it is greater than 0.5°C (at the reference temperature of 70°C). To ensure probes are working correctly ‘on the day’ it may be wise to perform an ice point / boiling point check (using iced water at 0°C and boiling water at 100°C) before use.
Calibration (set-up) of appliances used to cook or heat foods
It’s important to calibrate all appliances used for instruction development, regardless of whether the product will be heated in a conventional or microwave oven, grilled, fried, boiled, steamed etc. It is important that the cooking environment (temperature or heat output) of the heating appliance is known and that it is operated consistently. Problems can arise, for example, with a gas hob or grill, with a high medium and low setting. What does a medium setting mean, how can it be quantified? If a medium heat setting was used, the operator may not be confident or be able to prove that they are able to use the same heat setting in the future, or that a particular heat setting they use is actually representative of that used by consumers. Yearly calibration of microwave ovens is considered acceptable as the output from the magnetron is unlikely to deviate (unless a component fails) even with setting changes, however far more regular appliance ‘temperature setting’ testing should be performed for all other cooking appliances (including ovens, grills, hobs and air fryers). The Campden BRI recommendation is that all appliances (apart from microwave ovens) are calibrated at the required (air) temperature on the day of the trials (or if the temperature setting in adjusted e.g. from 180°C to 200°C). This is because appliances that are only calibrated yearly can, and do, give inaccurate and unknown appliance cooking temperatures for the following reasons:
- It is difficult to ensure a dial setting (e.g. on an oven) is placed in exactly the same position as when the appliance was calibrated. If the dial is not in exactly the same position, the appliance temperature may be inaccurate and different to the calibrated value.
- Any appliance component thermostat drift or failure would not be detected until the following calibration – which may well be a year away, the appliance would continue to operate incorrectly, giving cooking instructions based on inaccurate appliance cooking temperatures.
Grills and hobs
At Campden BRI, a performance assessment method for both hobs and grills has been developed. Many appliances were tested to determine the average performance on e.g. a medium setting. The methods were based on:
- For hobs - heating a known volume of water over a set period of time to give a defined temperature rise e.g. one litre of water heated from 20°C to 70°C in five minutes was defined a medium setting
- For grills - heating a reference ‘model’ metal sausage over a set period of time to give a defined temperature rise e.g. from 20°C to 80°C in three minutes was defined a medium setting
These standard procedures allow both grills and hobs to be set up in the same way each time the appliances are used. Since the calibrated heat settings were based on tests with a range of different domestic appliances, there is a degree of confidence that the calibrated appliance will give a similar heat output to grills and hobs used by consumers.
Hot air ovens
There are three main types of domestic oven used by consumers: gas, electric and fan assisted electric ovens. Each has a different heating mechanism, so can heat foods at different rates. These differences mean that it is crucially important to test product instructions in all three oven types. It is not acceptable to use a single oven type e.g. non-fan-assisted electric oven and then assume a product will heat in a similar time in a gas oven at the same temperature setting or a fan-assisted oven operating at 20°C less. Examples of how differently ovens can perform are shown below. The ovens have all been set up at a centre temperature of 220°C. The graphs (figures 2, 3 and 4) show the change in temperature with time.
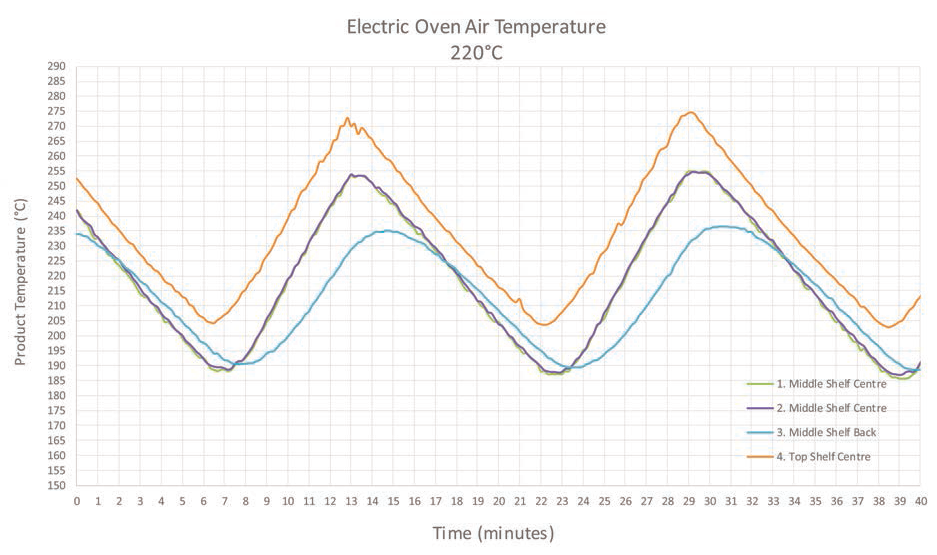
Figure 2. Electric oven (top shelf centre, middle shelf centre and middle shelf back position air temperatures)
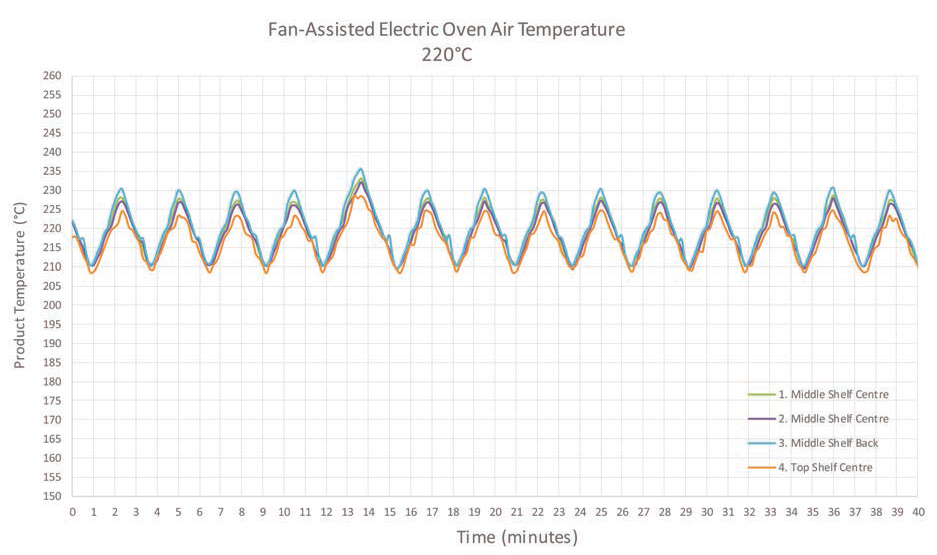
Figure 3. Fan assisted-electric oven (top shelf centre, middle shelf centre and middle shelf back position air temperatures)
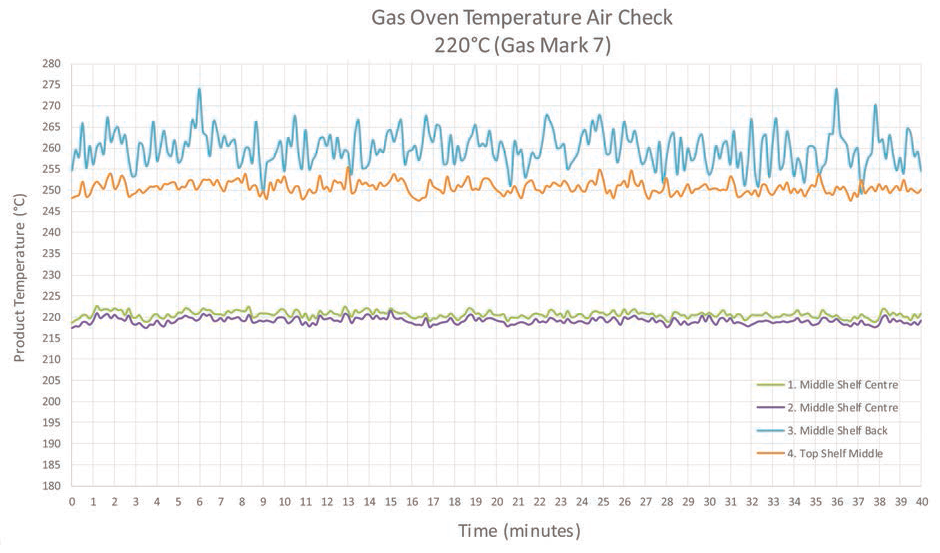
Figure 4. Gas oven (top shelf centre, middle shelf centre and middle shelf back position air temperatures)
Ovens should be calibrated to give the required air temperature in the centre shelf position and in the middle of the oven. This is where products should be placed for cooking as placing in another location (e.g. top) will give very different air temperatures for the different oven types. A single measurement of the oven temperature taken after pre-warming the oven is not sufficient, as it may have been taken anywhere along the cyclic temperature profile (as the oven thermostat turns off and on). If a single point temperature had been taken, depending on when it was made could have given an incorrect oven temperature anywhere between 187°C and 255°C! (see the example of the extra data in figure 2).
The temperatures of the oven should be logged over a period of time once the oven has reached its steady state operating temperature, and the average air temperature taken as the true reading. In the electric oven example above, the oven set temperature was 220°C and indeed the average temperature measured (in the centre) over two cycles of the thermostat turning off and on was similar to the set temperature (hence the oven could be considered to be set up correctly). But it was necessary to log the oven air temperature (in the centre of the oven, ensuring the probe measured the oven air temperature and not any metal oven parts e.g. the shelf) over the two (or more) cycles to gain an accurate reading of the average oven temperature.
The non-uniformity of temperature within the oven cavity can also play a role in the quality and safety of reheating instructions. Although the electric oven had been correctly set up to give an average centre air temperature of 220°C, the top shelf position of the oven attained a peak temperature of 275°C. This is probably above the safe maximum temperature of most plastics used for food heating in ovens. This upper temperature (at the top of the oven) would not be known if the oven temperature had not been logged over time.
Furthermore, it is surprising how often the temperature dials on the cooker bear little resemblance to the actual air temperature in the oven, a basic factor that will have a significant effect on product safety and quality. Ovens operating 20°C different to the set temperature are not uncommon and obviously can’t be used to validate product heating instructions. If the oven used to develop an instruction for a product was not calibrated and was operating at 20°C higher that then the set temperature, then if the product was to be heated in a consumers’ oven working correctly at the set dial temperature it would be operating 20°C lower than the oven used to develop the instructions. This would mean that it is very likely that the product heated in the consumers ovens may not receive an adequate reheating process, thus putting the consumer at risk of food poisoning. An accurate knowledge of the test oven temperature is key.
Microwave ovens
The calibration and use of microwave ovens for instruction validation is a complex area. The only standardised method of measuring the power output is described in a section of the IEC 60705:2015 document. This method is not described here. Simpler abbreviated methods of measuring the power output e.g. using two 500ml beakers of water cannot be relied upon to give an accurate result and should not be used. Indeed, calibrating ovens using a non-standard method can give an oven power output that may be lower (or higher) that the actual power output. This can have serious implications for food safety as consumers’ ovens may insufficiently heat products if the instructions have been validated using ovens calibrated using methods other than that described in EC 60705:2015. For more information on this rating method obtain a copy of the Standard IEC 60705:2015 or contact Campden BRI.
Selection of microwave ovens
It is important that the variation in microwave oven performance is considered when selecting ovens for use in instruction validation. The use of just one or two microwave ovens to develop instructions is unwise and can result in the instruction being only applicable to the oven(s) used. This can result in the product not performing well (over or underheating) in other microwave ovens.
Microwave ovens of different designs should be chosen for instruction validation trials. This is to help ensure they produce different microwave field patterns inside the oven cavity (and food product) and hence help ensure the validated instructions will be applicable to the wide range of ovens in consumers’ homes. Figure 5 shows thermal images of a product (pastry) heated in different design ovens with different field patterns (higher temperatures are white - c.90°C and lower temperatures are blue/black - c.30°C)
Uniformity of heating - oven variation
- Microwaves interact with the oven cavity, food and packaging - microwave field can vary between ovens
- Different microwave ovens of similar power can heat products differently
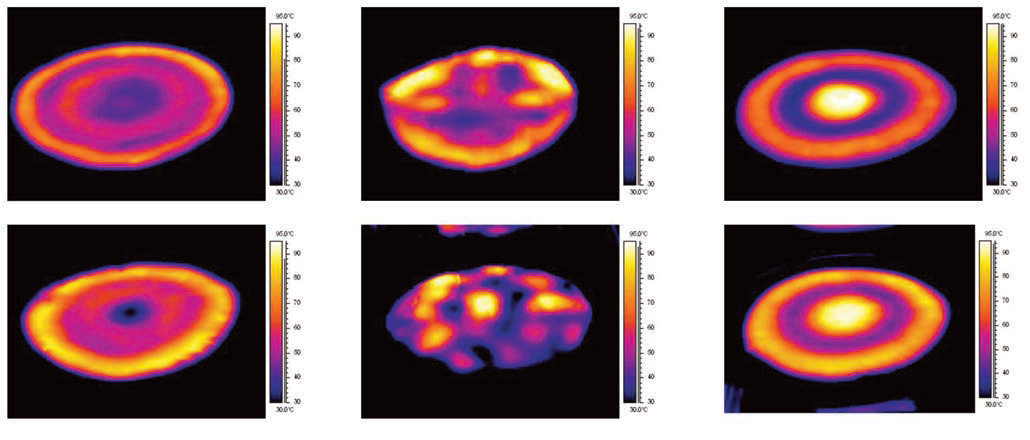
Figure 5. Thermal images of a pastry heated in different design ovens
The two images on the left show ovens with greater turntable edge than centre heating. The two images on the right show ovens with greater turntable centre than edge heating. The images in the centre are from non-turntable ovens.
The different features that should be considered when selecting microwave ovens include:
- Turntable or non-turntable
- Large cavity size or small cavity size
- Painted steel or stainless-steel interior
- Combination (e.g. grill or hot air oven and microwave) or microwave only
The power output of microwave ovens can be affected by the power supply voltage. The higher the supply voltage the greater the power output and vice versa. Hence it may be wise to control (or at least measure and record) the microwave oven supply voltage while instruction validation tests are performed. For the oven power output to be correct the supply voltage should match what is shown on the microwave rating plate. Figure 6 shows how the microwave power output can depend on the supply voltage.
The power output of microwave ovens is also affected by the temperature of the microwave magnetron (the microwave producing component in the oven). The magnetron heats as the oven is used and the power output of the oven can reduce as the magnetron heats up. Figure 7 shows how the microwave power output can reduce with microwave operating time.
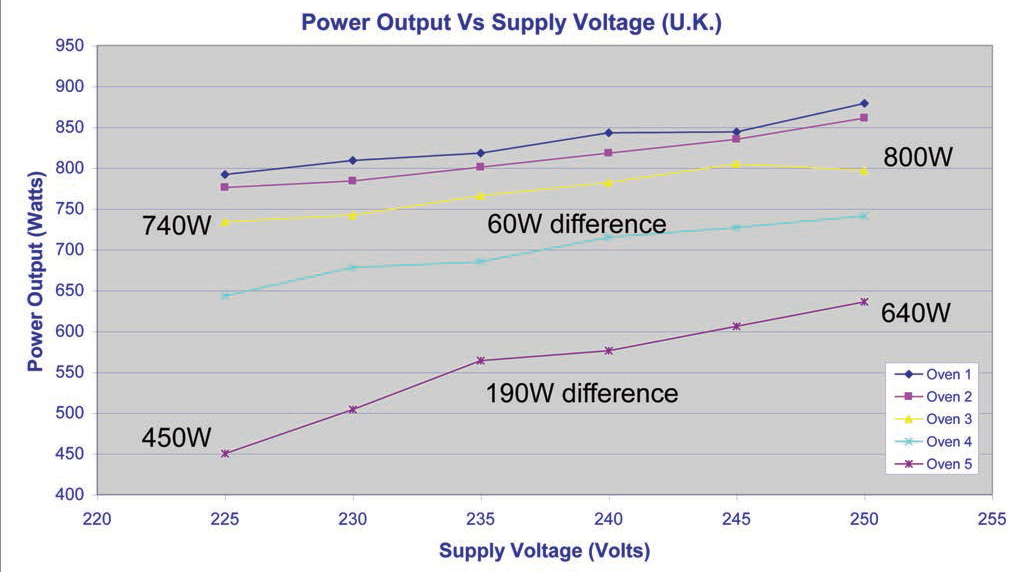
Figure 6. Microwave power output - supply voltage
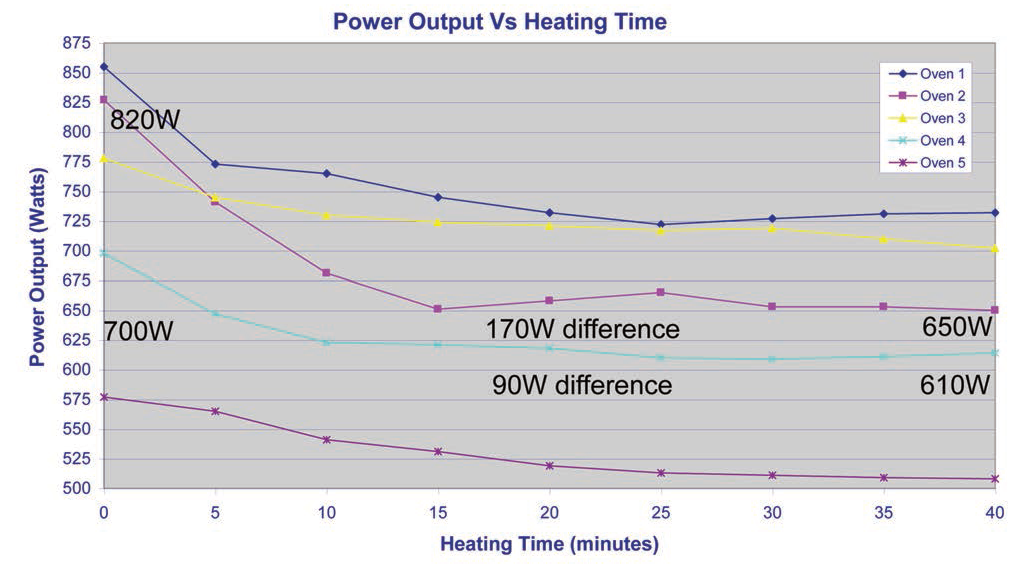
Figure 7. Microwave power output - magnetron warming
The graph (figure 7) shows that the power output stabilises after about 15 to 20 minutes use and it could be suggested that microwave ovens should be preheated for this time before instruction validation trials are performed. This would allow testing the instructions in the worst-case scenario where the microwave had been used previously (and the power output had reduced). Using this approach can result is products overheating if they are heated using cold microwave ovens (as there is more power given to the product), however if cold microwave ovens are used to develop instructions, then products heated in warm ovens (e.g. if two products are heated one after another) may not attain a safe minimum temperature. Microwave oven magnetrons can take several hours to cool down.
Barbeque instructions
It is impossible to validate the safety of barbeque instructions due to wide differences in barbeque performance. Instructions should be developed and validated using another appliance e.g. grill or oven with a suggestion to ‘finish off’ on the barbeque after cooking fully.
Selection of samples for testing
Worst case scenario
Instruction validation should be performed to ensure the instructions will allow the delivery of the required minimum thermal process (or temperature) using worst case samples. Worst case samples are those defined as taking longest to heat. If trials are performed using ‘average’ or ‘mean’ samples then the worst-case samples would be unlikely to achieve the minimum (safe) thermal process. So, samples chosen for testing should be selected to have:
- Coldest start temperatures likely to be found in consumers fridges or freezers - e.g. 0°C to 3°C for chilled, -20°C to -18°C for frozen
- Thickest samples likely to be found in the samples supplied to consumers
- Heaviest samples likely to be found in the samples supplied to consumers
Product initial temperatures must be stable throughout. This is best achieved leaving samples to stabilise at the correct temperature throughout e.g. overnight in a large, stable temperature controlled fridge or freezer (e.g. walk in appliance). Note that use of a domestic fridge or freezer may cause issues with sample temperature uniformity and stability. These appliances can warm up considerably (and outside the suggested limits) if they are opened and closed several times in a relatively short space of time.
To ensure that the validated instructions will also give acceptable results for the broad range of production products, it may be wise to also test slightly warmer, thinner and lighter products from within the intended product supply range.
Similar products within a range
Every different product within a range should be tested as even slight variations may alter the cooking time required. For example, it is not acceptable to develop instruction for a soup and use this instruction for different soups without fully testing the instructions. Likewise, any changes to a product, recipe, packaging etc would necessitate further instruction validation testing.
Replicate trials
Several replicates need to be performed in each appliance to help ensure the attainment of reproducible results. Most retailers and Campden BRI suggest a minimum of five are performed in each appliance. For example, if oven cooking is given as an instruction a minimum of five ‘successful’ replicate tests should be performed in each oven type (gas, electric and fan-assisted) i.e. a minimum of fifteen trials. However, some retailers are happy with less replicates e.g. two or three performed per appliance. The term ‘successful’ refers to samples shown to receive the required minimum thermal process (or temperature).
Recording instruction validation trial methodology and test results
All information related to instruction validation trials should be recorded and retained for at least the life of the product. This provides evidence that trials were performed for due diligence reasons, but it can also build a reference database of products and suitable instructions (and a starting point for future instruction validation trials). It may be beneficial to write a standard procedure which can then be referred to. For each product the following information should be recorded, in the form of a ‘report’:
- Product name / specification / code / production date
- Methodology used, including how and when instruments and appliances were set up (calibrated) and any temperature probe temperature checks (iced water / boiling water). Number of replicates performed. If information is referenced elsewhere e.g. calibration of temperature measurement devices, then this can be referred to.
- Identification of the appliances and instruments used e.g. microwave serial numbers, temperature probe / data logger reference number, balance reference number
- Sample weights (thickness etc) ensuring worst case samples are selected. Sample start temperature (for each sample and taken immediately before cooking). Digital images of samples before heating may be useful.
- Results obtained, including heating times used, minimum final temperatures (or equivalent thermal process in minutes at 70°C), cold spot locations, issues found during the trials e.g. overheating. Digital images of the heated samples. Graphs of the sample minimum temperature against time (if data loggers are used) during heating and any stand times.
- Conclusions drawn, did the samples heat acceptably from a quality point of view and achieve the required minimum temperature (or thermal process)?

About Greg Hooper
Greg has worked here at Campden BRI since 1990, after studying Applied Science (Physics and Chemistry). As part of his extensive knowledge and experience in thermal processing and microwave cooking, he was instrumental in setting up the microwave heating category rating system used in the UK, and has travelled internationally assisting and advising on the safe development of microwave products and rating systems.
Interested in learning more?
View our reheating instructions service page for more information.
How can we help you?
If you’d like to find out more about cooking instruction validation, contact our support team to find out how we can help.


